
This post may contain affiliate links. Affiliate links use cookies to track clicks and qualifying purchases for earnings. Please read my Disclosure Policy, Terms of Service, and Privacy policy for specific details.
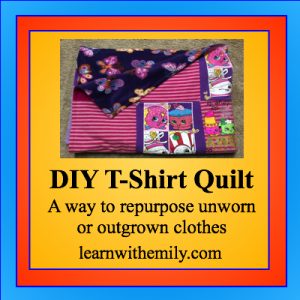
One of my children who has very strong sensory sensitivities to clothing ended up with a pile of 11 Shopkins shirts that were no longer comfortable. Rather than donating them, I decided to make a t-shirt quilt so we could get more use out of them (some had never been worn). A DIY t-shirt quilt can be made from any pile of t-shirts you have that were either outgrown or no longer worn. This type of quilt is a little more complex than sewing exclusively on woven (or not stretchy) material, but if you can sew a straight line and gently flatten the t-shirt material on a woven base, then you can sew this quilt.

Skills Needed
- Sew along a strait edge with a sewing machine or serger
Materials
- A set of t-shirts. I used 13 shirts that were sized 6-8. You may need more or less shirts depending on the size of the shirt and the size of the quilt you want to make.
- A woven (or non-stretchy) material to use as a stabilizer for the t-shirts. I used a thrifted sheet.
- A piece of fleece fabric large enough to cover the back of the finished quilt. My finished quilt was 58.75″ x 48.75″. My fleece piece was 2 yards long.
- A piece of cardboard to use as a tracing template for cutting out rectangles. I used a cereal box.
- A washable marker (I usually use Crayola washable fine tipped markers when sewing)
- A sewing machine and thread.
 Procedure

Step 1: Cut the quilt blocks
- Decide on a size for your quilt block based on the size of the t-shirts you are using. My template was 12.5″ x 10″. This worked for size 7 t-shirts. Then, make your template on cardboard.
- Place your template on each shirt and trace around it with a washable marker. Then cut along your lines. I traced on the front of the t-shirt, and then cut through both the front and the back at the same time.
- Next make the same number of quilt blocks with the thrifted sheet (or other woven material) as you have from the t-shirts. I ended up needing 25 blocks to finish my quilt.
Step 2: Arrange the quilt blocks
- Lay out the t-shirt quilt blocks on the floor. Then arrange and rearrange until you have the rows and color patterns in a way you find visually pleasing.
Step 3: Prepare the quilt blocks and sew together
- For each quilt block, I laid a t-shirt block on top of the woven (thrifted sheet in my quilt) block. Then a gently spread out the t-shirt block so that it was fully covering the base block without any wrinkles and pinned it in place. This step required careful spreading. The t-shirt material will likely stretch a little larger than your original template and will not exactly line up with the base block. If you are a beginner, you may want to baste (sew around using a longer stitch length) around the pinned quilt block, with 1/4″ seam allowance, using the base as your guide. Then trim to the size of your base block.
- Once you have 2 quilt blocks prepared, sew them together along the edge using 3/8″ seam allowance.
- Continue sewing quilt blocks together in a row until you have completed the first row. Sew the remaining blocks into the rows you have already arranged. You may want to gently press the seams to one side.
- Than sew the rows together using 3/8″ seam allowance.

I used my serger to piece this quilt together, but a regular sewing machine will also work. I pressed my seams on each row in the opposite direction to limit bulk when I sewed the rows together.
Step 4: Back the quilt
- Lay out the fleece fabric face up on the ground. Place the pieced quilt (faced down) on top of the fleece. Smooth out the fabric and pin in place.

- Your fleece will probably be larger than the quilt top. After you pin the front and back together, you can trim the extra fleece fabric to match the same size as the quilt top.
- Sew the two pieces together using a 3/8″ seam allowance, leaving a 6-8″ opening on one side. Pivot at the corners.
- Flip the quilt to the right side by pulling it through the opening. Push out the corners so they are nice and square.
Step 5: Finishing the quilt
- Pin around the quilt making the edges of the front and back even.
- Hand sew the 6-8″ opening closed.
- Top stitch around the edge (I used a 5/8″ seam allowance).

Conclusion on the DIY T-shirt Quilt
I love the way this quilt turned out. At first my daughter said she didn’t like it as the t-shirts had glitter on them and she thought that wouldn’t be comfortable when sleeping. I said if she didn’t like it, I would use it. She changed her mind and now sleeps with it every night. The quilt has a good weight to it and the fleece backing makes it really soft and comfortable. Now my other children want me to save their old t-shirts to make each of them a t-shirt quilt.