
This post may contain affiliate links. Affiliate links use cookies to track clicks and qualifying purchases for earnings. Please read my Disclosure Policy, Terms of Service, and Privacy policy for specific details.
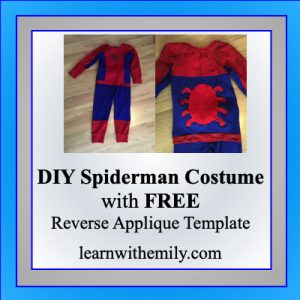
My 4 year old loves dressing up like super heroes. This DIY Spiderman costume is made out of cotton lycra knit fabric, making it sensory friendly and comfortable for both sleep and play. This article explains the resources and process I used to make a DIY Spiderman Costume.
How to sew a DIY Spiderman Costume


Overview
You will need a knit shirt and pants pattern as a base for this project. I used the Alex and Anna Winter PJ pattern from Peek-A-Boo pattern shop.
Supplies to make your DIY Spiderman Costume
- Alex and Anna Winter PJ pattern. Click here to buy the Alex and Anna Winter PJ pattern from Peek-A-Boo pattern shop.
- Red cotton lycra knit fabric
- Blue cotton lycra knit fabric
- Tracing paper or copy paper (to adjust pattern)
- Black fabric paint
- Thread to match
- Elastic for the waistband

Procedure to make a DIY Spiderman Costume
Step 1: Draw piecing lines on your pattern.
*Disclaimer: The drawings below are not to scale. They are hand drawn to demonstrate the process used to color block a pattern into a Spiderman costume.


Take your front and back bodice pieces and draw lines to form the different colored sections for the Spiderman outfit. First draw a waistband on the bottom of both bodice pieces (eg., front and back). Mine was about 2.5 inches. Next draw a curved line on the bodice front from the front armhole down to the waistband line. One the back bodice piece draw a line from the bottom of the arm cycle to the center back.


On the sleeve pattern piece, first draw a horizontal line below the elbow area (may vary depending on size). Next, draw a vertical line from the sleeve curve to the pervious horizontal line. I measured the point on the front bodice arm cycle and matched it to my sleeve so the blue-red split would match up on the sleeve and bodice pieces.


Draw a horizontal line on the pants piece below the knee.
On all pattern piece sections, make a note of the color you want to use for each piece.
Step 2: Add seam allowances to the new cutting lines.
Next, take your pattern pieces and cut along the lines you drew in the previous step. Add seam allowances to both sides of the new edges. I added 1/2 inch to each edge. CLICK HERE to see a more detailed explanation on how I added seam allowances when using the Alex and Anna Winter Pajama pattern to make a Super Mario Costume.
Step 3: Cut out your pieces then assemble the sections to the original pattern pieces.
Cut out your pattern pieces using your split patterns. Also cut out a neckband, sleeve bands and leg bands in red according to pattern directions.

Sew your split pieces together to match the original pattern pieces.
Step 4: Reverse Appliqué the spider symbol on the back.

Draw out the spider shape free hand on a piece of paper. I used an image search for Spiderman to get an idea of how it should look. Once I had what I wanted, I made sure the spider was symmetrical. If you want to use mine, CLICK HERE to download it for free. This one is what I used for a 5T shirt. I also have a file of a half spider image HERE that you can use to enlarge or reduce for different sizes. Cut out the shape and then trace around it, centered on the outside of back bodice piece.

Next, place a piece of red cotton lycra (large enough to cover the spider image) under the blue back piece with the spider drawn on it. Pin these two layers securely together.

Carefully sew on top of your drawing lines. You can use a basting stitch or a narrow zigzag. I used a stretch stitch on my machine, but would not recommend doing this unless you are experienced with reverse appliqué. If you make an error, stretch stitches are pretty impossible to remove without damaging your project.

Next carefully cut away the blue layer of fabric on the inside of your stitching line.

Zigzag around the edges to securely finish the spider edge.

Trim around the outside of the red fabric on the underside of the bodice back.
Step 5: Sew your project together following pattern directions.
Step 6: Add in the web and spider designs using black fabric paint.
Use a fabric paint bottle to make the spider and web designs on the red portions of the outfit. On a previous Spiderman outfit I made, I used black sharpie or fabric markers, but these faded pretty quickly. The fabric paint has held up after many washings without fading.


Adding the fabric paint took me a few days. I started with painting the spider on the bodice front.

After this dries, complete the web design on small sections. Let the paint dry 4 hours (or the recommended time on your fabric paint bottle) on each section before painting a new section.
Conclusion on Sewing a DIY Spiderman Costume
Enjoy your DIY Spiderman Costume!