
This post may contain affiliate links. Affiliate links use cookies to track clicks and qualifying purchases for earnings. Please read my Disclosure Policy, Terms of Service, and Privacy policy for specific details.
When I taught in a self-contained public school setting, I worked with an excellent OT who introduced me to a multi-sensory approach to handwriting. Although I do not have nor remember her original multi-sensory handwriting program source, the just of the program was to start with gross motor practice, move to fine motor practice, and then move to writing the letter. This article explains the multi-sensory process I have used with my own children as a homeschooling mom.
General Philosophy to go with the Multi-Sensory Handwriting Approach
Handwriting practice can become monotonous and downright boring. As such, I have found that the best ways to maintain the interest of my children include:
- Using a large variety of materials for practice
- Applying the philosophy of “less is more.” For example, it is better that the child practice a letter a few times correctly rather than practice an entire page incorrectly.
Multi-Sensory Handwriting Program Overview
For each practice session, pick a larger motor movement activity to form the letter, 1 fine motor activity to form the letter, 1 fine motor activity to trace or copy the letter, and 1 worksheet.
Large Motor Movement Activities

– Form the letter in the air with a light up wand.

-Write out large road-like letter shapes and “drive” the correct formation with a toy car. You could also use other high interest small toys (e.g., ponies, bugs, animals, etc.) to “walk” along the later in the correct formation.

–CLICK HERE to download a free set of large alphabet letters. These do not have road lines, but you could easily add them in after printing out the file. Just add the lines with a white paint pen. Trim the pages and glue them to construction paper or other durable paper. Next laminate or place the pages in plastic sleeves for durability.
CLICK HERE to download a free large set of outline style alphabet letters that can be used for the same purpose.

Fine Motor Practice Activities Level 1

- Handwriting without Tears Wood Pieces. The child forms the letters with large wood pieces either on top of a model or copying the letter. You can buy the wood pieces directly from the publisher along with the laminated letter cards.
- Other letter building activity sets with manipulative pieces. A letter snap together construction set, a magnetic letter set like this one or this one, and a play foam set all look like fun.


- Handwriting without Tears Magnet Doodler (use the wood magnet pieces to form the letters).
- Handwriting without Tears Roll-a-Dough letters (form the letters with play dough using the templates included in this set, or make your own templates).
- Build letter or copy with legos. You can do this with lego letter cards (see my Fine motor Pinterest board for pins/links) or on top of the letter cards I use for manipulatives (See below).
- Have the child form the letter by placing a manipulative-type of object on the letter. CLICK HERE to download a set of letters to place manipulative-type objects on. You can also use the larger letter set, depending on the size of your manipulative objects. These can be printed on cardstock paper, glued to construction paper, or glued to index cards for durability. Laminate or cover with clear contact paper to help the letters last even longer.


I have used, counting bears, dinosaurs, unifix cubes, pom-poms, and links. If you want to double the find motor fun, use tweezers to move the objects on top of the letter (this option may work best with pom-poms).


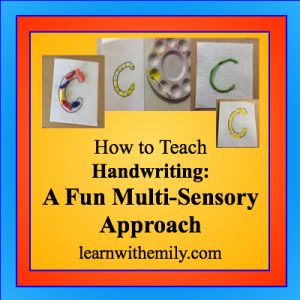
- Dot paints. I just took the half size outline style letter and drew circles on it to mark where to paint.
- Cotton swab dot paint with tempera paints. I also used the half size outline style letter for this activity and drew small circles within the letter to show where to paint.
Place small stickers on the letter. CLICK HERE to download a free set of outline style letters to put the sticker on.
- Spaghetti writing. Form the letter shapes using pieces of yarn. If you write the letters on pieces of felt, the yarn stays in place a little better. I cut a sheet of felt into 4 pieces and wrote the letter on with a sharpie.
- Wiki Stix. Use a Wiki Stix alphabet set or form the letters using Wiki Stix on your
own Alphabet Cards.
 Place
Place  own Alphabet Cards.


Fine Motor Practice Level 2
Tracing with correct formation
Wet-Dry-Try. This uses the Handwriting without Tears Chalk Board Slate. First the adult writes the letter. Then the child can trace it with a wet paintbrush or sponge piece. The child can form the letter again by drying off the wet line with a cotton ball or small cloth or skip write to tracing the shape with a piece of chalk. There is also an app available using this format. I have this Wet-Dry-Try app, but never use it as it is too difficult for my children. It is frustrating for them as if they go slightly out of range, the app makes them start over. I like the chalkboard slate approach better.
Handwriting without Tears Magnet Doodler (use the yellow magnet pen to trace the letter on the screen)
- Paint letter with water colors. CLICK HERE to download a free set of outline style letters that can be used with water colors or markers.
- Write within the lines of a letter with a fun marker. You could repeat the activity on the same paper with several colors for extra practice. Use the letter download above listed with water coloring painting.
- Rice, sand, or salt tray. I put mine in rubbermaid square containers with lids. Or try Kinetic sand. CLICK HERE to read more about Kinetic sand.
- Write in play dough. I put my play dough in a rubbermaid container too. Use a dull pencil to write in the play dough.
Copy letter on Dry Erase Board


 Copy letter on


Worksheets to Use with this Multi-Sensory Handwriting Program
I do use a variety of worksheets for handwriting practice. I pick sources that have fewer practice items on them per page. All of the worksheets I currently use are from Teachers Pay Teachers. Here is a list of the ones I am using for Kindergarten/1st Grade handwriting practice.
- Print Path Mega Bundle. If you search for Print Path, these workbooks can also be bought separately.
- Giant Letters by Teaching for Fun. I have printed these as large letters, but also make smaller ones by printing 9 or 12 per page.
- PreK and Kindergarten handwriting packet by YAY for PreK
- Handwriting Activity Sheets by Playdough to Plato
- Trace and Try Handwriting Pages by This Reading Mama
Handwriting without Tears
I have used and liked the Handwriting without Tears program. I still use components of the program, but not necessarily their workbooks. The workbooks could be used in conjunction with other writing practice activities; however, I found that the more variety I provide the better. I personally prefer pdf handwriting pages so I can print out exactly what I want and need for each child.
More Multi-sensory Handwriting Practice
Although many apps are available to practice handwriting skills, my personal favorite is Letter School. There are various levels of practice and the included animation has been motivating and enjoyable for my young children.
What Order Should I Teach the Letters?
If you ask an Occupational Therapist, they will tell you to teach capital letters first. Developmentally, capital letters are easier to form than lower case letters. I am currently following the sequence from the Print Path Mega Bundle. You could also follow the sequence from Handwriting without Tears.
Some children I have worked with have gotten stuck on capital letters. If the child has difficulty with change (like some autistic children), I would recommend holding off on spelling activities until the child has learned to write lower case letters. If the child needs to work on their name, I would recommend teaching them to write their name with the first letter capital and the rest lower case.
Ways to Adapt this Multi-Sensory Handwriting Approach
Multi-Sensory Handwriting for Young Children
For younger children, you could eliminate the worksheet practice and use the practice activities that you feel are appropriate and fun for your child. My 2-year old enjoys doing the painting activities and did several of my samples that I photographed for this post.
Multi-sensory Handwriting for Older Children
You can use any combination of activities that are interesting for your child. Older children may prefer just worksheet practice, and/or level 2 fine motor practice. A similar system can be used to learn and practice cursive letters for children in upper elementary grades.
Conclusion on Teaching Handwriting Using a Multi-Sensory Handwriting Approach
When I teach handwriting in the method described in this post, my children come running to the table to do their handwriting. They love it. An activity that could be boring and monotonous becomes fun and exciting using a variety of materials and practice approaches. I usually do a 2-week rotation with each letter. You can use the free monthly planning sheet included in this blog post to keep track of the letters covered and your child’s progress. You can also use the free systematic review planning sheet from this blog post to determine how frequently you need to review each letter.
Free Downloads to use with this multisensory handwriting approach
Please use these for personal use only. If you want to share these with others, please refer them to this blog post to download for free for themselves.
Here is a hand-out with a summary of this Multi-Sensory Handwriting Program:
If you missed the free downloads included in the activity lists, here they are in one place:
Alphabet Letters for Manipulatives