
This post may contain affiliate links. Affiliate links use cookies to track clicks and qualifying purchases for earnings. Please read my Disclosure Policy, Terms of Service, and Privacy policy for specific details.
My children and I continue to use our child-sized tables daily for homeschool and other activities. I absolutely love how the crate seats turned out and they work perfectly for my children. As I sat on one at the table with my children, I did not feel very stable. The plastic would seem to buckle slightly and I decided I needed another option that was a little more stable for an adult-sized body and weight. In comes the need for a new DIY sturdy seat out of left-over 2×4 wood.

Disclaimer:
I am an amateur builder. Please use appropriate safety precautions when using tools and the resulting furniture. You may use the plans for the DIY Sturdy Seat described in this post for personal use and at your own risk.

Materials
- 2 x 4 wood pieces. You should be able to fit the cuts for one table out of two 8 ft 2×4 boards (you will have left over wood).
- 2 1/2 ” screws
- 1″ or thicker seating foam
- Staple gun and staples
- Fabric (I used some flannel backed vinyl I had in my stash from Walmart)
- Scrap of plastic or cardboard (large enough to cover the seat)


Tools:
- A hand saw, circular saw, or table saw to cut the 2×4 boards
- A drill and bits for pre drilling screw holes
- A drill or screw driver for securing screws

I have this Ryobi drill bit set. It has everything I needed for pre drilling holes and securing screws in my projects.

Cut List:
- 2 pieces of 2×4 cut to 16″ long
- 8 pieces of 2×4 cut to 10″ long
Procedure:
1) Form the frame base for the DIY sturdy seat
- First cut the pieces to the indicated lengths.

- Form the outside frame by screwing together the two 16″ pieces and two of the 10″ pieces.

Pre-drilling holes will help the screws go in smoothly and prevent the wood from splitting. CLICK HERE to read my post about assbling the table where I explain my method on pre-drilling holes.
- Next attach the middle supports (two 10″ pieces) for the seat. I used 2 screws per side.

- The last step in assembling the frame is to attach the legs (four 10″ pieces). I used 4 screws per leg for extra stability.
2) Upholster the DIY sturdy seat base frame
- First I attached a scrap piece of plastic to the top of the DIY sturdy seat to cover the gaps between the support wood. I had a plastic lid from a broken plastic bin that I cut for this purpose. Cardboard could also work. I stapled this to the top of the seat using my staple gun.

- Next, I cut my seat foam to fit the top of the seat. I happened to have two 1″ pieces left over from my crate seats, so I used both for extra comfort.

Lastly, I laid my crate upside down (with the foam) on my fabric. I pulled the edges of the fabric up and stapled it down to the bottom edge of the seat. I folded the extra fabric in on the corners as I went.
Conclusion
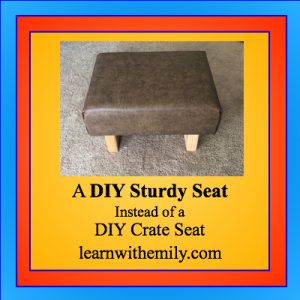
My finished seat is both comfortable and sturdy. It is the perfect height to go with the DIY tables for kids we use for homeschooling. I spend at least 2 hours per weekday on this little seat and it works well for my adult-sized weight.